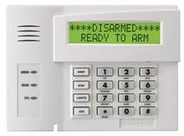
Customers


Vista System
Arm System To Away
1. Press 4-Diget code
2. Followed by the [2] key
3. System should now be starting delay

Arm System To Home
1. Press 4-Digit code
2. Followed by the [3] key
3. System should now be starting the delay without countdown beep


Disarm System
1. Press the 4-Digit code
2. Followed by the [1] key
3. System should now say Disarmed

Bypass a Zone
1. Press 4-digit code
2. Followed by the [6] Key
3. Press the two digit zone number

Change a Code
1. Enter your 4-digit MASTER code. (ex 1234)
2. Press [8] + user number you wish to add. (ex 8)
3. Start with User 03 to 33  (ex 03)
4. Enter in desired user’s security code. (ex. 1234 8 03 1111)
5. The keypad beeps once to confirm that new user was added.


Delete a User code
1. Enter your 4-digit MASTER code
2. Press 8 + user number you wish to delete.
3. Press the pound [#] sign then [0] (ex. 1234 8 03 # 0)  [DO NOT delete the MASTER code USER 02]

Turn the Chime On/Off 
1. Enter your 4-digit USER code.
2. Press 9.
3. Repeat to turn off.


Apex System
Arm System to AWAY
1. Press 4-digit code
2. Press the [A] key for AWAY
3. System should now say armed to away

Arm System to Stay
1. Press 4-digit code
2. Press the [H] key for home
3. System should now say armed to home


Disarming the System
1. Press 4-digit code
2. System should now say disarmed
 
CHANGING/DELETING USER CODES
The Destiny allows 32 different disarm codes. 
Check with your installer to find out how many codes you have enabled.
Assuming your primary code is 1,2,3,4:
1. Enter your primary user code followed by “7”. Example: 1,2,3,4,7.
2. The system will speak “ENTER USER NUMBER”.
3. Enter 2 digit user number, (01-32). The system will speak “ENTER CODE XX” (XX=01-32)
4. Enter the new 4 digit code or hit the A key to delete the user code from step 3.
If a new 4-digit code is entered the system will speak “EXIT” after the 4th digit.
If a code is deleted the system will speak “CODE OUT, EXIT”.

Bypassing Zones
To BYPASS a zone is to temporarily remove that zone from the system. 
To enter BYPASS mode, your system must be disarmed.
Make sure the system is disarmed and follow the steps below:
1. Enter your disarm code and immediately press the 9 key to gain entry into BYPASS mode.
You will hear “BYPASS MODE, ENTER ZONE NUMBER.”
2. Enter the two digit number of the zone (use a leading zero if necessary, 01,02…) you wish to bypass. (Your installer can provide you with a zone list, if needed).
You will hear a description of the selected zone, followed by, BYPASSED ON or OFF.
Only zones that exist in the system can be bypassed.
If an invalid number is entered, refusal will be signaled by three beeps.
3. Press the * or A key to toggle between on and off. (A “BYPASSED ON” condition indicates that the zone is bypassed).
The yellow STATUS LED will light to indicate that the zone is bypassed.
The RKLCD keypad will display the zone descriptor in the LCD display.
A second push of the * or A key within 10 seconds will remove the zone from bypass and the yellow STATUS LED will clear as well as the zone descriptor on the LCD display.
4. Pressing 00 while in BYPASS mode will clear (unbypass) all bypassed zones.
5. Press the # or H key to exit BYPASS mode, or the system will exit in 5 seconds.
You will hear the system speak  “EXIT”.

Toggling Monitor
MONITOR Pressing this key toggles the system between three possible monitor conditions.
MONITOR ON – System will announce doors and windows when opened.
MONITOR OFF – System will not announce doors and windows when opened.
MONITOR TONE – System will beep instead of speak when doors and windows are opened. 


Moose z1100
Your Personal Alarm Code (PAC) is the last digits you enter typically starting afterh the [1] key

Arming your system
1. Verify that the READY light is on.
2. Press the ARM command (Key #1) and your PAC
3. The control station will begin beeping and the red ARMED light will come on indicating that the system is armed.
4. Leave the building immediately.


Disarming the system
1. After entering through a delay zone the keypad will start sounding
2. Press the ARM command (key #1) and your PAC
3. The red ARMED light should be off indicating that the system is disarmed
4. If the system ARMED light doesn't go off press the star key (*) and restart procedure

Arming the System with out leaving
1. Press the INTERIOR command (key #4) and your PAC
2. The yellow interior off light will come on.
3. Arm the system by using the ARM command.

Turn Monitor On
1. The system must be disarmed
2. Press the MONITOR command (key #6) and your Pac Code
3. The Keypad will beep three times each time a zone is opened

Turn Monitor Off
1. The system must be disarmed
2. Press the MONITOR command (key #6) and your PAC
3. The Keypad will no longer beep when the door's open.


Everfocus DVR
Search By Time
By mouse: Right-click to bring up the menu bar and click Search to enter Search Menu.
By front panel: Press ”Search” key to enter Search Menu directly.
Play From: Select the time to begin the search by choosing the Date and Time. 
Click on the “Play” button to start the search.
The DVR will automatically begin to play the video selected.
The DVR will play the nearest time if there is no data at the selected time. 
In search playback mode, pressing the “Stop” button will return to the search menu


Search By Event
Select starting date and time
Then Select ending date and time. 
Select which cameras to include in the search. 
Select which event type(s) to search for.
Choose from Alarm, Motion or Video Loss. 
Click on the “Search” button to start searching.
The search results will be shown as a list of events.
Previous Page: Go to previous page
Next Page: Go to next page
Play:Playback selected item
Copy: Copy selected item

Burning Video
To bring up Copy menu:
By mouse: Right-click to bring up the menu bar and click on Copy to enter Copy Menu.
By front panel: Press the “Copy” key to enter Copy Menu directly
Camera: Select which cameras will be archived. Choose “Select All” to select all the cameras. 
Player: Check the box to include the ePlayer program as part of the copy (recommended).
Start Date/Time: Select the starting date/time to be archived.
End Date/Time: Select the ending date/time to be archived. 
Copy To: Select whether you want to copy to USB or CD/DVD (CD/DVD on “D” models only).
Data Size: Shows the estimated total size for the time period. 
Copy Now: Press “Copy” button to start archiving.
Please Give Us Your Opinion